

Antique Pool Table Restoration: Part #2
Welcome back to Part Two: Antique Pool Table Restoration. If you’re just getting started then I’d highly recommend to start with Part #1 so you’re up to speed. We left off at learning about finishing and staining the table so let’s dive right in and look at the final three steps of completing the restoration of an antique pool table.
5. Cushions, Rails, and Pockets
The wood cushion rails (or handrails) are replaced with Brazilian or East Indian rosewood to keep authentic and prepare to have new cushions attached. Replacing both the wood rails and the cushions provides the best playability. Almost all antique billiard tables have too much damage to the top hand rail from years of use and abuse. After new rails are built, new pocket openings need to be cut out from the wood rail and restored to the exacting dimensions of the original pockets. The pockets are repaired or replaced as needed to replicate original materials and design. From there all rail cushions are replaced because the originals are unplayable. We replace cushions with top-of-the-line modern cushions that will not become hard or brittle. These cushions are then covered with new cloth using fine upholstering techniques. It’s a specific process with a combination of trimming, folding, stretching, wrapping, and then securing the cloth to the cushion liner. Now the table will withstand years of billiard play.
_-_28de80_-_5506a6d6c66b5a532a2a808781559422ef2c7a7f.jpg)
Before cushions and rails (Left). After cushions, rails, cloth and pocket. (Right)
_-_28de80_-_85f13479641c542319f1083f609265100e88fd90.jpg) Restoring pocket openings.
Restoring pocket openings.
6. The Slate
The next step in the restoration process is to ensure the slate is in mint condition. Playability has a lot to do with the bed of the table, including the slate, be perfectly level with tight seems. This creates an even and accurate roll of the ball which is a necessity in the game of pool. The bed of an antique table typically consists of 3 - 4 pieces of 1” – 1 ½” slate, although some 6’x12’ tables have 5 pieces of 1 ½” thick slate. A slate bed piece weighs between 250 to 400 pounds each depending on the size of the table and thickness of the slate. Ok, if you do the math that’s 1,000 – 2,000 pounds per table just for the slate! Most of the original slate beds have stood the time, however we do repair or replace when needed to ensure years of accurate billiard play. We prefer using the original slate pieces because they were attached in a specific fashion. They are not interchangeable to any other table’s design like modern tables are today.
_-_28de80_-_28dd5bb757ec2486d87f50171f39388471d05711.jpg)
Repairing a piece of slate for an antique table.
_(550x393)_-_28de80_-_9762e32158043ebbdeec3509c82c7552f2c31aa5.jpg) Example of a 3 piece slate bed.
Example of a 3 piece slate bed.
7. Table Set Up
The last remaining part of the restoration is the set-up of the table in its new home. Each antique table is unique so not every set-up is exactly the same, but many hours are put into every table and include (but are not limited to) these steps:
- Our crew of 2 - 4 installers will carry all parts of the table into the home with the frame weighing around 1,000 pounds and the slate weighing between 1,000 to 2,000 pounds.
- We then begin the detailed process of putting the frame components together like a jigsaw puzzle, including the sides, ends, legs and cross members. All pieces have original stamps from the manufacturer to ensure that pieces are lined up in the correct locations.
- The table is positioned in the room and pre-leveled against the floor under the legs.
- The slate is laid on top in a specific order. Each piece of slate fits in only one location. Now everything is carefully lined up with the original screw holes which is necessary for the integrity of the frame structure.
- Another step of leveling is to re-check the floor level, as well as the slate level to the frame. Once the weight of the slate is on the frame, shims are used between the slate joints and frame bed. The preciseness of the leveling occasionally comes down to using shims thinner than a piece of paper.
- A torch is used to melt organic beeswax which is poured into the joint seams and screw holes to fill, smooth and prepare the slate for cloth. Beeswax is used rather than a hard filler because it can absorb a little seasonal movement.
- Next we attach the cloth to the bed by using upholstering techniques of stretches, pulls, and slacking at the right time. Once the bed cloth is tightened and even across the table it’s secured to the slate liner.
- The rails are now attached with various types of bolts and the pockets are slipped in before the final tightening of those bolts. Pocket tabs are then secured to the face of the pocket openings and pocket baskets are covered with decorative leather trim.
- The table is now ready for years of play.
_-_28de80_-_d503a19373757271a43ac30ddc2540a26ccdb172.jpg)
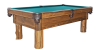
Cabinet #1 Antique table restored and set up.
We have restored and installed many antique pool tables over the last few decades. It’s the restoration process that brings these beautiful and timeless works of art back to life and it’s a fine craft we’ve been perfecting for years. The exacting details and time that go into restoring an antique table are only accomplished through years of experience. Nothing compares to the beauty of a high-end restored antique pool table.
Do you have antique table of your own that needs repair or full restoration? Interested in a showroom appointment? Please contact Greg Peterson, Steve Slyce, or Scott Mullin.
More information on Antique Billiards Tables:
Antique Pool Table Restoration: Part #1
Antique Pool Tables - Available at Peters Billiards
Grand Opening: Peters Billiards Antique Pool Table Showroom
A Rare Find – Antique Billiards Tables & the Collector Who Brings Them to Life
Thanks for visiting Entertaining Design.
Recent Posts
Categories
Socialize with Us
Sign Up for Emails
Be the first to get info on sales, new items and more.